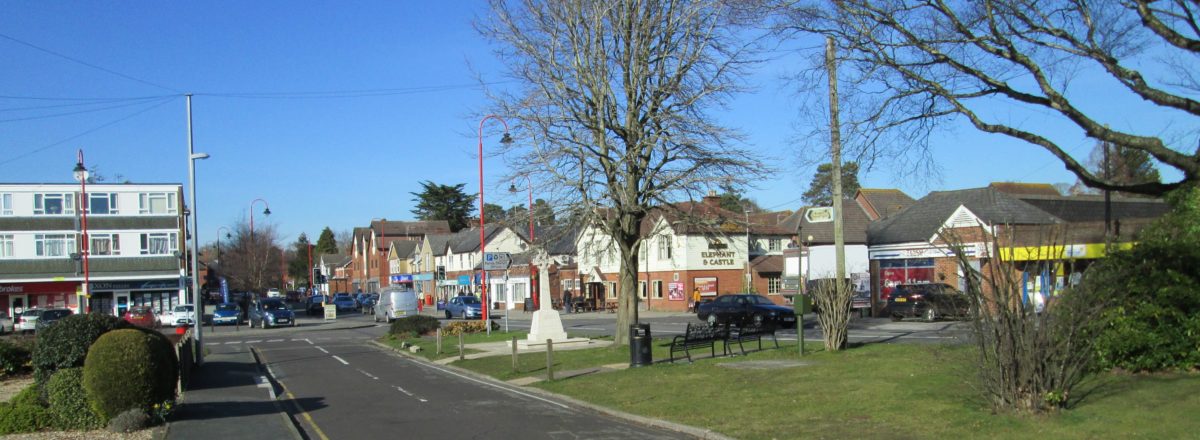
This article is based on a section of my history of the local railway that used to run through West Moors: I have added more material from presentations I gave in 2016 & 2017 to gatherings in the community. I have attempted to show just how important the railway was to the success of the Normandy landings of June 1944 . . . and for a few months thereafter. Much depended upon the success of these operations – men simply going about their duties, now largely forgotten.
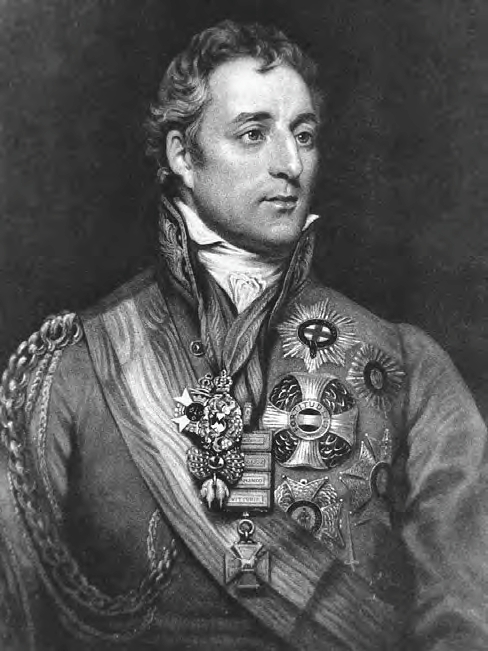
What, you may ask, has His Grace the Duke of Wellington got to do with the story of West Moors, its railway and the Second World War. Bear with me!
The ‘Iron Duke’ was no lover of the railway – any railway! There are two reasons that historians generally give for this view: coming from the undoutbted ‘ruling class’, he was suspicious of anything that would allow the populus to ‘move about’ – disturbing the ordered pattern of rural life – and allowing ideas to spread rapidly creating dissent. In this of course, he was quite right! This is precisely what the Victorian railway system had achieved by the end of the 19th century – with powerful forces initiating change of great benefit to working people. The other, specific reason for not liking railways was the unfortunate accident to William Huskisson P.C., M.P., who died after being knocked-down by a railway locomotive at the opening of the Liverpool & Manchester Railway in 1830. The Duke of Wellington was present as ‘guest of honour’ and Huskisson, who was attempting to offer the hand of friendship to the Duke after a disagreement, mis-judged his situation and, grabbing the door handle of the Duke’s carriage thinking to haul himself out of the way of the engine, found that it had not been latched: he fell back onto the track and was hit by the ‘Rocket’ travelling on the adjacent track. Huskisson was widely regarded as an economist of note – and had served in several Cabinets in previous administrations. His death at age 60 robbed the nation of the talents of a clever man.
But, move forward a dozen years, into the early 1840s. The Duke is very much the ‘national hero’ and grand old man of British politics. His command in the field at Waterloo (1815), although a generation past, still resonated with the populace. His opinions on the great affairs of state carried weight: the French, though soundly defeated in the continental wars and on the High Seas, were still a threat – wherever the British Empire spread its fingers, the French were sure to be next door! And of course, they were brooding just the other side of the English Channel. Although Wellington was ill-disposed to railways in general, their use in moving troops about to counter any French invasion threat got his whole-hearted support. So when the Southampton & Dorchester Railway, an ‘east-west’ formation, ideally placed to serve the coastlines of Hampshire & Dorset encountered opposition, the Duke spoke in favour. Napoleon might have long left the field of battle, but other French tyrants might arise.
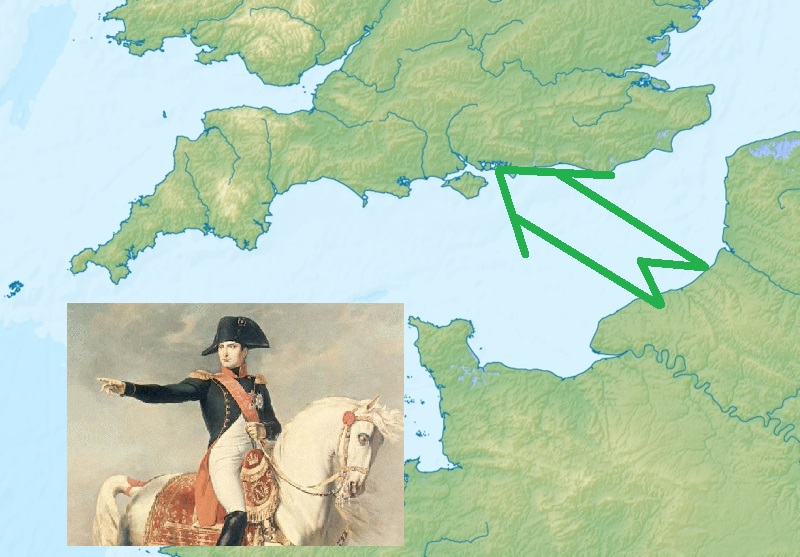
What of course the Duke could not have forseen, was that no such invasion would trouble our shores – at least by France. Other invasion threats there would be – but these would be countered by Naval and Air Forces in the 20th century. However, where the railway envisaged by Wellington would make its mark was for supporting an invasion in the opposite direction: from Britain over to France . . . the Normandy landings of Operation Neptune / Overlord of 1944, almost a century after the Duke of Wellington has thrown his weight behind the local line. He could not have anticipated that the local railway would play a vital role in that operation – one that, if it had failed, would have changed the course of European history.
… THE RAILWAY … AND THE SECOND WORLD WAR:
Tension surrounding Britain’s relationship with Germany had been growing for several years in the 1930s, and in September 1938, the Munich crisis added urgency to the preparations already underway to bring this country’s military & civilian services to bear fully to face-down the threat. This was in marked contrast to the situation preceding the Great War of 1914-18 when hardly any ‘land’ preparations had occurred (the Royal Navy up to 1914 had been planning to match or exceed German naval capability for at least 10 years).
All of Britain’s railways (including London Transport) would play a major part in keeping the nation supplied and service personnel moving. The railways of southern England in particular were likely to play a vital role, both in supporting defence in the early years, and from 1943, in operations to oust Axis forces from occupied Europe.
And the railway nearest to the ‘action’ was the Southern: not only did it serve all the main cross-Channel ports / harbours but many of the large Army depots, training grounds, oil storage facilities & the rapidly growing numbers of RAF airfields defending southern Britain, including London. Later in the war, the United States 9th Air Force was also based in the ‘heart’ of Southern territory across Dorset and Hampshire.
The schematic map (below) shows the railway network (not all minor lines are shown) that criss-crossed ‘central-southern’ England, principally by the Southern, but some areas are also served by the Great Western & the Somerset & Dorset Joint (which was co-worked by the Southern). The lines edged in white are the Southern’s ‘backbone’ lines at this time.
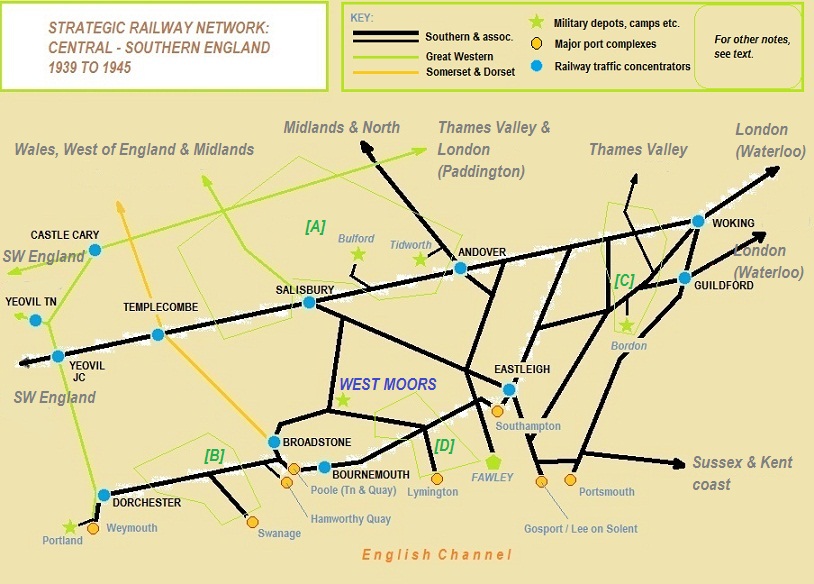
Most of the map is self-explanatory: four major military (mainly army) training & residence areas are indicated:-
[A] Salisbury Plain training & barracks areas / ranges; also some RAF airfields.
[B] South Dorset tank training & testing areas: also basing locations later in the war.
[C] North Hampshire / NW Surrey training, barracks & testing area/ranges.
[D] New Forest / SW Hampshire training and basing areas.
In the last summer of peace in 1939, when tension was reaching a peak, large areas of the heathland across southern England played host to army exercises both by ‘regulars’ and reserve forces. The New Forest [ area ‘D’ in the map above ] was one such area, and the double-track ‘Old Road’ demonstrated its usefulness by transporting large numbers of men and materiel for these camps – and with double track available, such movements could be filtered in and out of regular (as yet peace-time) traffic with relative ease.
… PREPARATION FOR WAR:
Locally, land had already been purchased (in 1938) from the Gundry estate (the Shaftesbury family) on what had been known since the early 19th century as ‘Gundry’s Inclosure’ to the north-east of the village; work started to prepare it for use as a petroleum and ammunition storage depot – the latter being the dominant element. The railway was quickly involved bringing personnel and supplies, though it’s important to understand that the extensive system of sidings described later did not come along until 1943 with the arrival of U.S. forces. As far as I’ve been able to determine, for this early ‘British – only’ project (the US didn’t enter the war until December 1941 following the Japanese attack on Pearl Harbor), the existing goods sidings and possibly a small ‘spur’ siding ‘up line’ of the junction were used to offload. West Moors was chosen due to its proximity to the still ‘dualled’ Old Road and the useful link north-south via the Salisbury line. It was also within reasonable distance of the great army training & base areas on / around Salisbury Plain [ area ‘A’ in the map above ] and the railway also gave it good links to the army bases in NW Hampshire (e.g. Aldershot, Camberley, Pirbright etc., area ‘C’ above).
And one final advantage: if the ammunition or fuel were to be ignited by whatever means, there wasn’t much of a nearby population to be affected!
The railways of the nation were quickly thrown into war work – even before war was officially declared: just prior to declaration of hostilities (Poland invaded by Germany 1st September, UK/Dominions/Empire declared war 3rd September), Britain’s railway networks were brought under government control effective 1st September, using the same scheme as in the Great War: the Railway Executive Committee [REC] acted as an ‘arm’ of government – with representatives of all four ‘major’ railway companies, as well as London Transport.
One of the first coordinated actions performed by the railway under Whitehall direction was the evacuation of children from the larger towns and cities of the United Kingdom to country regions – this action was long in the planning, having been mooted the previous year during the ‘Munich crisis’. In this area, children from Southampton, a prime air bombing target due to the major docks facility there, were moved to West Moors (along with other places in rural Dorset & Hampshire). During the period 1st to 4th September, apart from essential ‘peak’ hour passenger traffic, most other services were suspended to cope with this movement of children.
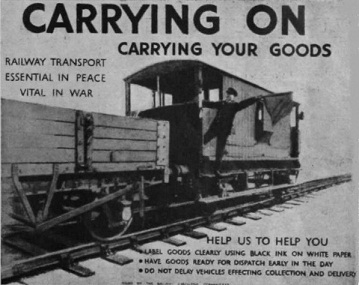
One other immediate consequence of the declaration of war was that the railways were expected to give priority to goods (in our area farm produce) & military traffic, at the expense of ‘civilian’ movements; to this end, many lines, including our local services, lost a number of time-tabled movements and remaining services became rather more unreliable as to timing. From this time on … the posters asking ” Is your journey really necessary? ” appear to hammer the point home that the country’s railways were given over totally to support for the military – and the need to economise in the face of shortage of some fuels and trained manpower.

… SPREADING SHADOWS:
The eight month period from September 1939 to early May 1940 is often described as the ‘phoney’ war, but of course it was anything but. On the high seas, Britain’s supply lines were already under intense submarine & surface raider attack and this emphasised the need for home-grown production of food. West Moors and the surrounding area was well placed to scale-up this work as farmers & growers were already supplying fresh produce to local markets. But more was needed: an indication of the steps taken to bring more land into production was that very early in the War, the West Moors cricket club had to vacate their playing area on the Woolslope Farm fields to allow ploughing and crop planting.
It was clear by April 1940 that an attack by Germany on her neighbours in the west could not long be delayed. One interesting rail movement through the station in that month (before hostilities had broken out in western Europe), saw two rail-mounted 12″ Howitzers rattle through West Moors from storage at Ringwood to Corfe Castle on the Swanage branch; they were to be used for area defence in case of invasion – a very real threat!
On the 1st May, Frence forces surrendered to the German High Command and it was clear that we were next on the list! In early May 1940, instructions were issued that in the event of invasion, level crossing gates should either be tied back clear of the track, or removed completely. I’m not clear why this should be, though I assume that normal rail traffic scheduling would be abandoned and ‘best endeavours’ procedures adopted such that road users crossing the railway would have to look out for themselves!
In mid-May 1940, the Royal Train passed through West Moors at a very sensitive time, as Allied forces were being pushed back across northern France to the English Channel coast. The country was preparing for a German invasion. The Royal family were particularly active in visiting areas that contained concentrations of military personnel and equipment around this time of heightened tension and as part of these visits, King George VI and Queen Elizabeth (later the Queen Mother) were conveyed in the GWR royal train formation over the ‘Old Road’ in the early hours of Tuesday 14th May from London to Broadstone Junction, there being taken north again onto the Somerset and Dorset Joint Railway to Blandford – then a major centre for troops-in-training and on defensive duties; the royal party de-trained, travelling cross-country to rejoin the train the following day when it had been worked ’empty stock’ Blandford – Broadstone (reversing) – Wimborne – West Moors – Downton. (The old ‘direct’ link between Corfe Mullen Junction & Wimborne Junction had been abandoned in 1933). At Downton, the King & Queen rejoined the train after they had visited Breamore House, then HQ Southern Area Command – a vital link in the command-chain preparing to defend the country.
By the end of May 1940 the land & air battle raging across France was being won by German forces: an invasion onto mainland Britain was expected late summer or autumn of that year. The railways of southern England in particular were quite literally ‘on the front line’, and the Duke of Wellington’s enthusiastic support for an ‘east-west’ railway running along the south coastal area of England (see above) over a century earlier was seen to have been prescient. Mind you, he envisaged French troops as the aggressors, not the Germans! And although perhaps not planned, in true British ‘muddling-through’ fashion, the retention of the double-track on the Old Road was also a major boon to the war effort: as we have already seen, sections of running line could be taken out of use and used as storage/temporary berthing without significantly affecting movement of troops, supplies, equipment etc.
A little down the line towards Wimborne, a War Department (WD)/Government siding was added to the layout at Uddens Crossing and brought into use during 1943. It may be, given the date, that this siding was used to relieve pressure on freight facilities at Wimborne and West Moors, though another explanation is that timber from the Uddens estate was transferred through this facility – or stores were held on the estate for issue elsewhere; also, in the build-up to D-Day, Uddens House was a local management point for the construction projects hurriedly being undertaken to support that vital operation. For whatever reason, Uddens became a busy place again, and whereas it had been downgraded to a staffed crossing as recently as 1938 (with its signal box closed), in June 1943, a signalman once more took charge and Uddens became a ‘block post’ again, working with West Moors to the east and Wimborne to the west.
And along the Salisbury line, at Ringwood and other locations along the ‘main’ line through the New Forest, temporary sidings were built to support HQ units in some of the ‘great’ houses / estates that had been requisitioned for the war effort & to support the building of temporary army/RAF (later U.S.) force concentrations. Traffic for these (and other) units added to the pressure on the Dorset & Hampshire railway network.
… THE VILLAGE AT WAR:
The arrival of War arrested housing development in a much more abrupt fashion than it did in 1914. This country in autumn 1939 was turned over to a ‘total war’ state, and for reasons such as absence of materials and manpower to build, few if any houses or bungalows were built in the period 1939-1945.
As described earlier, West Moors along with many such communities both in this county and around the nation, had to absorb its share of evacuees. In the early days, these were largely just children on their own – billeted with families in the area until it was thought safe enough to send them back home. However there were also cases where mothers (Dads were, by and large, in the Forces or in ‘Reserved Occupations’) would come to stay with relatives to get away from renewed bombing as the war dragged on. And during intense periods of air attack on British cities (autumn 1940 to spring 1941 & again during the ‘V’ campaign 1944 to early 1945), further large-scale evacuations were arranged.
All this of course had an impact upon the single school here in West Moors: in 1939, the number on roll at St. Mary’s was listed as 77 (at this stage to age 11 of course); by 1941, the number is given as 108! This 40% increase would have been difficult to handle at such a small school – the ‘Iron Room’ (on the other side of the road) came into its own and classes would have had to be staggered across the usual school day to cope. By 1945 though, the number was down to a more manageable 57 with the evacuees long gone home. Another pressure on the school at this time, as it had been since the 1920s, was the large proportion of children from the travelling community straddling the Oakhurst / Elmhurst part of St. Leonard’s Common. At one time the proportion was nearly a third of the total roll of this small school – with understandable problems of continuity of education for all. It would be another couple of decades before settled housing was provided and such children could settle.
West Moors, as for rural communities around the nation, took to its heart the strictures to ‘Make Do And Mend‘ and ‘Dig for Victory‘ with the best of them. This small, close-knit community was well suited to contribute to the war effort. The records of the time show the cancellation of meetings (due to petrol shortages) but also the holding of Women’s Institute (WI) meetings to make the most of home grown fruits and vegetables; I suspect there were many ‘matriarchs’ who were able to give the Ministry of Food officials a run for their money; they’d been making the best of things ‘for real’ for many years.
With Allied shipping being attacked by German submarines, particularly in the Atlantic, major efforts were made to turn all suitable land over to farming / horticulture to supply the home market. West Moors was already blessed with a good selection of small farmsteads / small-holders and similar enterprises. Local farms enjoyed a ‘boom’ during these war years, perhaps staving off an inevitable decline in local agriculture.
[ Government-sponsored aid to small-scale agriculture continued well after the war – into the early 1960s – when membership of the Common Market, cheap imports from overseas, the ‘mood’ towards huge boundary-less farms elsewhere in England etc., meant that nurseries, small-holdings, piggeries, chicken-farms etc., became less economic to run; most of these are now under houses, bungalows & care homes! ]
The ‘blackout’ was rigidly enforced: it was a criminal offence to show lights after dark from property or when moving about; the station would have been in near darkness on a late autumn or winter’s evening (the gas lamps had special shades fitted to filter stray light) – railway locomotives had tarpaulin curtains and awnings fitted to cabs so the glow from the firebox door (when open) could not be seen & passengers (‘chivvied’ by the guard and station staff) would be reminded to always have the blinds pulled right down after night-fall; a nightmare when trying to watch out for your station!
For train crew & signalmen, manoeuvreing engines / trains at night was fraught with difficulty and danger: here at West Moors, it must have been especially a problem controlling the movement of the lengthy fuel trains with use of signal lamps restricted. And at this distance of time we can only imagine the thoughts of footplate crew (and the lonely guard 50+ wagons to the rear) as they crawled slowly along with a fully-laden ‘mobile bomb’ of flammable liquid through the dark night.
In the village, restrictions on carrying & showing lights meant that evening events were either curtailed or abandoned and many simply didn’t venture forth in the hours of darkness – especially after autumn 1940 when West Moors lay underneath the path of German air fleets heading north (from France) bombing facilities in the Midlands.
Rationing was a gradual annoyance – in fact rationing became much worse once the war was won rather than during the early 1940s. In April 1943, local school-children benefitted from hot school meals which were served in the “Iron Room” across the road; according to Catherine Hazard in her history of St. Mary’s school, 40 to 50 children benefitted in this way. The cost was 5d (i.e. five old pence / roughly 2p) per meal. Before that the children had been able to get a bowl of hot soup and a piece of bread for a penny (old penny that is) from a deaf & dumb lady living in The Avenue (nearby).
Despite shortages of some foods and lack of variety, nutrition generally improved relative to pre-war conditions for large sections of the population.
Forestry Plantation: The Forestry Commission (FC) had been formed just after the First World War (1919) to ensure that Britain had an adequate supply of timber in the future. Many of our great plantations were laid out by them in the latter 1920s & through the 1930s, but it appears that the West Moors plantation was not developed (replacing rough heathland and perhaps existing low-level, sporadic managed woodland**) until the early years of the Second World War. It was regarded as part of the Ringwood Forest, and the West Moors section is just over 300 acres. In connection with the plantation by the Commission, housing was built for its employees at the head of Oakhurst Road.
[** Maps I have of the pre-war period show this area as being ‘wooded’ by the latter part of the 1930s so I assume some planting was done before the FC bought up the land to regularise production of timber.]
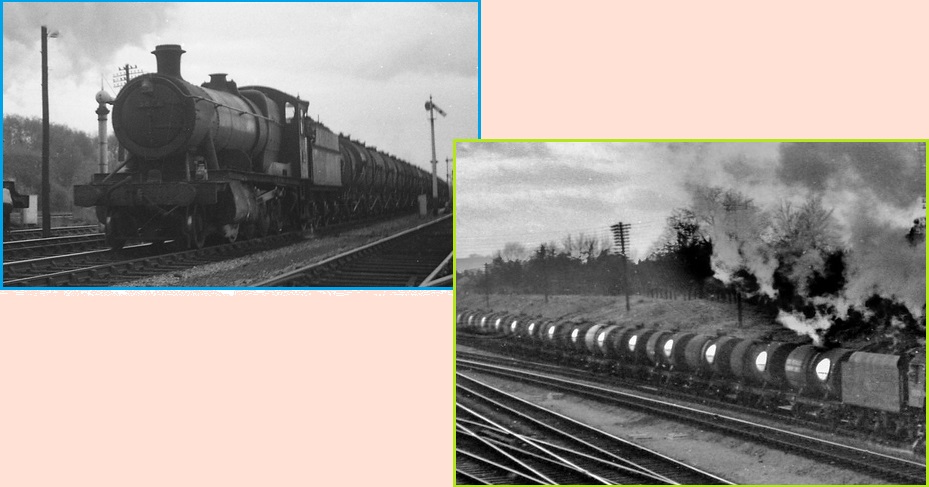
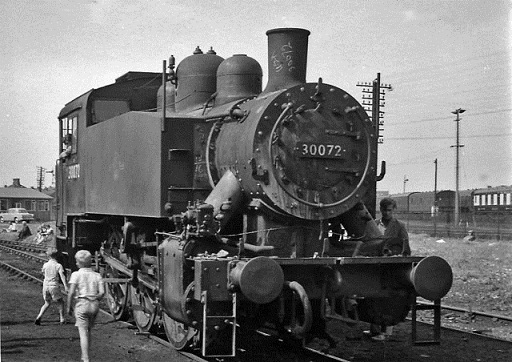
As the war dragged on, austerity became the ‘watchword’ in all things – not least in the building of railway locomotives! This engine (below), photographed after the war, is a Bulleid ‘Q1’, seen on duties that it was designed for – hauling mixed goods traffic. It does not have the classical ‘look’ of a steam engine but it was designed for maximum performance at the smallest possible ‘all-up’ weight, which of course also meant that materials used in construction could be reduced. 40 of these locomotives were introduced by the Southern Railway in 1942 and remained in BR harness until 1966 – not pretty, but they did the job. They would have been a frequent sight on railways around East Dorset.
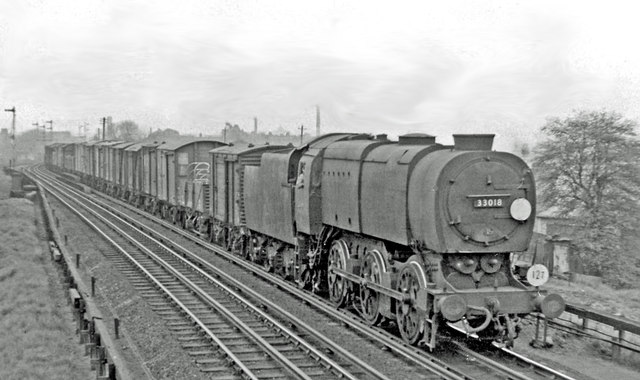
(c) Copyright Ben Brooksbank and licensed for reuse under a Creative Commons Licence.
… THE TURN OF THE TIDE:
The War dragged on, but the threat of invasion receded by early 1941 – the Germans decided to take on the Soviet Union: also, following the Japanese attack on Pearl Harbor, Hawaii in December 1941, the United States entered the conflict against Germany bringing its considerable industrial and human might to bear. With the arrival of US forces in 1942, several temporary airfields were constructed in the area; RAF Hurn (now Bournemouth airport) was expanded to cope with both transport and fighter flights and other temporary RAF airfields were built hurriedly to serve the Allied cause.
Whilst the Gundry’s Inclosure depot was in use by U.K. army forces as described above [1938 to 1943], the Memorial Hall was requisitioned for War Office use to support the detachment: the 10th Hussars are one unit that occupied this billet, though this would have ceased in 1942 when they were sent overseas (to Libya/North Africa). When the U.S. Army arrived in 1942, they built their own accommodation & offices adjacent to the depot & presumably had no need of accommodation in the village.
As part of the preparations for Operation Overlord, the installation of Allied forces in northern France [ now known as ‘D-Day’ ], the US Army constructed a large hospital at St. Leonard’s (nearby – see map below), for use by both U.S. and Canadian forces: Canada had large troop concentrations on Parley Common. The ‘rail-head’ for the construction of the hospital was Wimborne though West Moors would have seen some traffic given how close to St. Leonard’s it is.
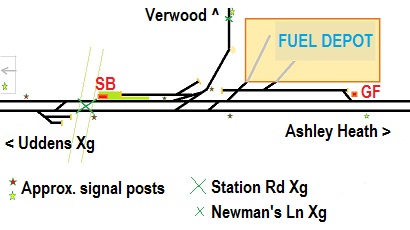
… FUEL DEPOT DEVELOPMENT:
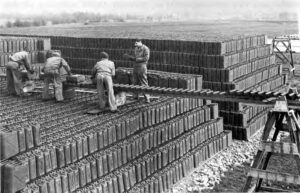
Perhaps the biggest wartime impact for West Moors was the arrival in 1943 of U.S. logistical support forces. The United States had been tacitly supporting the U.K. & Allies for two years, but the Japanese attack on Pearl Harbor in December 1941 brought the full might of U.S. power to bear. By summer 1943, plans were already far advanced for a ‘second front’ to be launched by Allied forces on the coastline of France – adding to the Soviet Russian pressure in the east, and the Allied advance in the Mediterranean and up the Italian peninsula. Fuel-oil and lubricants (otherwise known as POL: Petroleum-Oil-Lubricants) were as key to a successful invasion as ammunition & manpower. Work proceeded swiftly to convert the existing W.D. formation into a major fuel depot, complete with an extensive network of railway sidings, linked off the main line just east of the junction formation. According to BL Jackson (‘Castleman’s Corkscrew‘ / Oakwood Press), the track layout within the camp comprised 8.6 miles and 41 sets of points – this map is an attempt to portray the scene …..
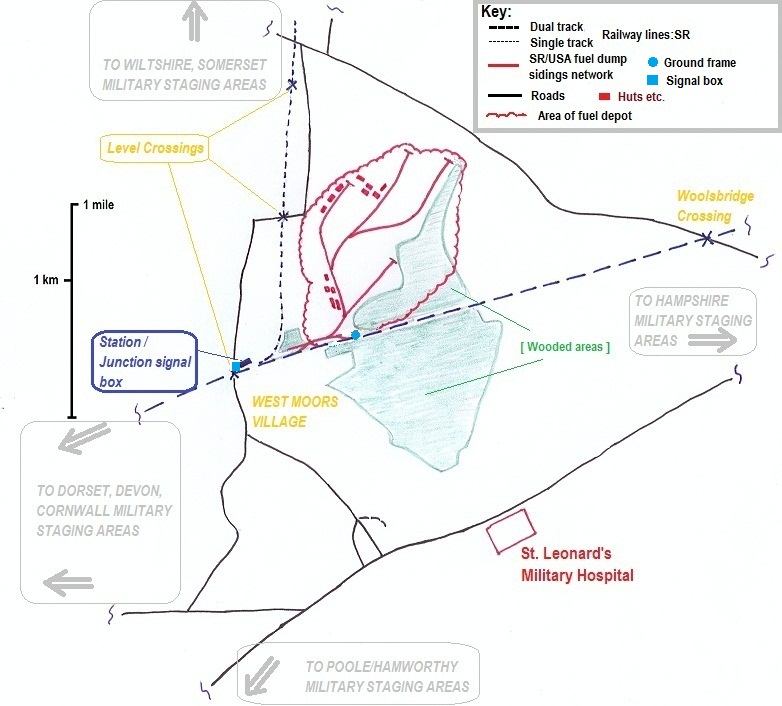
Schematic map showing the approximate layout of the West Moors military fuel sidings in 1944/1945, based on maps published just after the War.
In addition to the main network within the fuel depot, there was a loop off the ‘up’ (towards Ringwood) road to allow trains to leave the line (avoiding delay on that route), with berthing sidings available where depot locomotives would be waiting to break an incoming formation up, or assemble outgoing trains.
The points within the depot were hand-operated at each junction and the loop back onto the main line was controlled by a ground frame – released electrically from the main signal box at the station: however, the up facing switch [& associated facing point lock] giving access onto the loop, together with the newly-installed crossover from down to up lines, to allow fuel trains to reverse into the Depot, were controlled directly by West Moors box. [ There was also a long-existing crossover west of the Station Road crossing which could also be brought into use – but this would foul road traffic and would be used sparingly.]
[For more on Ground Frames, see later in this article]
[ Also shown for information is the location of the military (US/Canadian forces) hospital at St. Leonard’s. ]
The link with the national railway network became operational on the 14th February, 1943 at which date the additional levers in the signal box were brought into use – along with the iconic ‘3-arm’ junction signal; see below. The full network of sidings etc., was complete along with the rest of the depot infrastructure, by 24th July that year. It was under the control of the US Army’s 3877th Quartermaster Gas Depot Q328, and was one of six such depots scattered across the south of England, from Devon in the west to Sussex in the east (and two more elsewhere, one in Wales and one in Lancashire) that stored all the petrol, lubricants etc., for the forthcoming ‘D-day’ invasion for ALL allied forces in June 1944.
The railway ferried the fuel trains to / from the depot ‘holding’ sidings, with the US Army then using their own locomotives (brought over by sea from North America) to distribute within the camp.
Each rail tank car (RTC) or spirit wagon in British parlance, making up an individual train would contain about 3000 gallons (roughly 13600 litres) of fuel. With trains of some 50 wagons feeding the depot at peak usage, this represents something like 150 000 gallons (about 682 000 litres) of highly flammable fuel-oil moving slowly (or stopped motionless for long periods) at West Moors Junction and its sidings. The trains were limited to an average speed of 35 mph en-route and had to have frequent stops to check that the rake of wagons was secure, that brakes weren’t running hot, tail lamps were in place and lit and there was no leakage. When it arrived, such trains, with the locomotive and at least one brake van (some would have had two) would take up about 400 yards (roughly a third of a km) of track or about the length of 24 modern articulated lorries placed end-to-end. No wonder that West Moors, with its dual-track in place, was found to be ideal for handling this traffic.
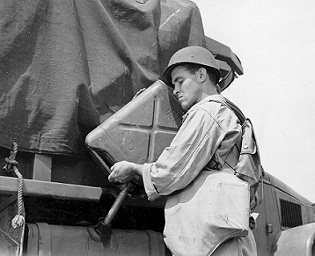
In addition, the village was an ideal strategic location for this facility; not only was it well served by the railway but it lay within a short distance of the major embarkation ports such that lorries could ferry the fuel to waiting convoys & to roadside ‘dumps’ across the southern English counties, from which military vehicles would take their allocation of fuel, oil, grease etc.
The impact on the local roads of all these heavily-laden vehicles trundling back and forth must have been severe; although the A31 (along with other trunk roads) was engineered to a reasonable standard, roads such as Station Road, West Moors/Three Cross Road, Pinehurst Road etc., would not have borne more than relatively lightweight pre-war lorries and tractors – and then only infrequently.
It is perhaps a miracle that the fuel depot did not come under sustained attack from the Luftwaffe; no doubt if they’d known of its importance, they might have tried harder, but only one raid came anywhere near landing a bomb on the depot – near, but not a ‘hit’, a single bomb landing harmlessly 50 yards away from the depot. It is a tribute to the reticence of the local population, the air-raid precautions and the ‘air shield’ of the RAF / USAAF that preparations for fuelling the Allied invasion effort were not put at jeopardy. It may be that because the village was sparsely-built, with no major mapped ‘feature’, e.g., church with substantial tower or spire, navigation by enemy bombers would have been very difficult – especially at night with a total blackout in force.
At its peak, the depot held 75000 tons of fuel (petrol) in five-gallon jerricans, with other lubricants and diesel stored in 55 gallon drums. During the build-up to D-Day (June 6th, 1944) and for a while afterwards, at least two lengthy trains of wagons entered and left the depot daily with bulk supplies, and several road convoys per day left for U.S. force concentration points across the south – sometimes the numbers of lorries reached 50 vehicles, each one packed to capacity with jerricans of fuel! The map below is an attempt to portray those movements … highly simplified!

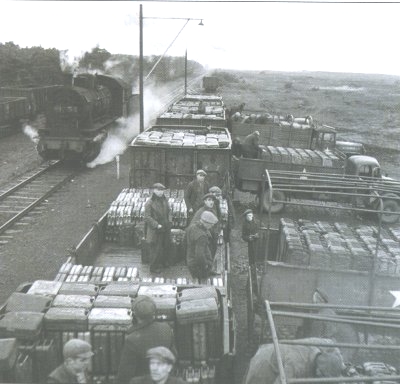
This image (above) is obviously of one of the rail-to-road transfer depots, similar to that at West Moors, but I can’t trace the location; it could well be on the heath given the background imagery and the lack of hills!
[ I’ve now ( 2020 ) been advised that this image is probably taken in Belgium: it was attached to a document relating to preparations for D-Day, so I assumed that this was in England! However, the exact location isn’t important; it shows a typical fuel ‘decanting’ operation from rail to road which is what happened all over the line of advance of the Allies, as well as on the English side of the Channel prior to, during and after ‘Overlord’ operations. ]
The outflow apparently peaked at 1700 tons per day during the immediate run-up to the Allied invasion of France. In August 1944, when the progress of allied forces across northern France was well advanced, 20 USA 2-8-0 locomotives and 75 American box cars were stored at the depot, prior to intended transfer across the Channel – though in the event many of the locomotives remained in the U.K., later being used by British railways. Shunting was by small but powerful locomotives shipped across from the United States for use by the United States Army Transportation Corps.
This is possibly an image of a roadside ‘fuel dump’ with rather a lot of Jerry-cans waiting for customers!
(c) Copyright Ben Brooksbank and licensed for reuse under Creative Commons Licence. It is possible that this particular engine (above) worked the West Moors sidings: it is an American-built Vulcan 0-6-0 & is seen here, much later in its life with its Southern Region number. After the war it passed to the Southern (then to British Railways, Southern Region), before ending up as seen here at Eastleigh for disposal or scrap. However, it was bought for preservation.
The ‘Old Road’ was perhaps at its busiest in the last 12 months of the war. Though we haven’t got explicit numbers of movements through West Moors, at nearby Ringwood, the crossing gates were opened over 160 times per day on some occasions. Although not all of the movements would have translated ‘down-line’ to West Moors, given that there were movements on/off Salisbury line, the Station Road crossing gates (and of course the signalmen) must have been similarly busy .. perhaps 8 or 9 times an hour – considerably more than at any other time in the life of the old main line.
… SIGNALS, SIGNALMEN & SWITCHES:
The changes to enable the railway to service the extensive network of sidings at West Moors were considerable: the existing junction signal gantry was replaced (or possibly modified – see below) by a ‘three-way’ equal-priority array; an additional crossover was installed just to the east of the existing (1866) junction layout; facing points and associated locking bolts were inserted into the ‘up’ line just east of this new cross-over; a ‘berthing’ loop off the main line was installed between this facing switch and a new trailing switch, with associated sidings / headshunts where engines could wait, or use for shunting; and finally, to control all switches (except the facing points and cross-over), a ground frame, alongside the trailing points was installed, as already noted above, electrically locked by the main signal box at the station.
[Ground Frames: Given the combined weight of the metal rodding (and associated frictional drag) that links a set of points with the signal box frame room, there was a physical limit to the distance that a signalman could ‘pull off’ switchwork. Generally, this distance was around a fifth of a mile (350 yards / ~ 320 m) and where a set of points was required ‘out in the country’ beyond this range, but within the area of responsibility of the signalman controlling the ‘block’ then a ground frame (GF) was usually provided to allow the points to be operated by the train crew or other responsible person. A GF is effectively a much scaled-down version of the classic lever-frame found housed in a signal box – it is often exposed to the elements as is the operator!
Typically, there will be around 3 or 4 levers: the lever(s) which physically move the switch blade, associated levers to lock the cross-bar to prevent unwanted movement and where required, levers to change shunt signals. However, the most important lever will lock all the others (preventing them from being operated) and this ground frame release lever is itself locked/released on authority of the duty signalman – either by the physical issue of a key which is placed in the locking block, or, as in the case of West Moors, by electrical release from the signal box.
GFs were used locally for another use – controlling the gates and associated protecting signals at Newman’s Lane.]
This diagram gives a rough idea of the layout of running lines, sidings, berthing / avoiding loops, head shunts etc., that the West Moors signalman (SB) would have to look after on a shift & also shows the relative position of the ground frame (GF) that was used to admit traffic back onto the running line.
In addition to conflicting road traffic crossing the railway at Station Road (which the Junction signalman also controlled), vehicle convoys (considerable numbers in the run-up to D-Day) would have to cross Newman’s Lane crossing adding to scheduling / control problems.
I doubt the railway in our little corner of England was busier before, and certainly not afterwards!
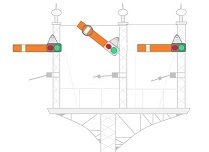
The very fact that facing points were installed onto a busy running line – and so close to an existing junction, shows how high the priority was to get the depot up and running: ever since the latter half of the 19th century, ‘facing points’, [ see diagram – green arrow indicates direction of travel] have been frowned upon where installed on a doubled line used for through running, due to the risk of a previous train (or the lead engine of the current formation) disturbing the facing plate and thus presenting a ‘switched’ diagram to the following train (or rest of the formation); if that train is travelling at any speed other than crawling rate, it is almost certain to be derailed.

For this reason, facing-point locks (FPLs) were installed on such arrays, so in the signal box there would be two levers for the one switch; the lever to move the switch-blade (coloured black) and another to operate a bolt (coloured blue) that locks the blade in position to prevent accidental movement; and of course these were also inter-locked with the signal (and other points) protecting the junction. More on this under ….
The ‘Facing-point‘ problem.

This diagram (above: very much simplified) shows a set of points that would allow a train to travel straight ahead. The locomotive meets the ‘turnouts‘ (the blades that bear against the running rails to guide the engine’s wheels), first, before travelling across the ‘switch’: hence the array is ‘facing’ the engine. A facing-point lock [FPL] is shown engaging the spacer bar which prevents the train disturbing the turnouts as it travels across the array.
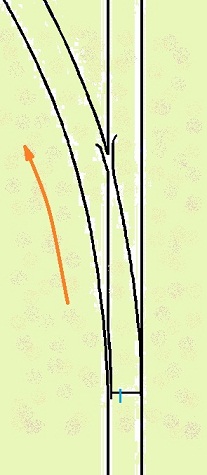
In this diagram (above), the turnouts are now set to guide a locomotive (or wagon etc.) to the left-hand branch. Before switching the array, the signalman would release the facing-point lock by a separate lever in the box, which disengages the bolt astride the spacing bar. The point lever is now thrown across, setting the route, then the FPL is reset such that it now locks the spacing bar once again. Until this is done, the junction signal cannot be set to be pulled ‘off’, i.e., give clearance to move across the junction.
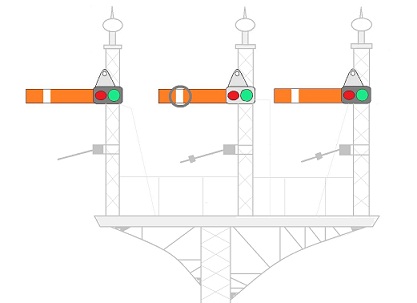
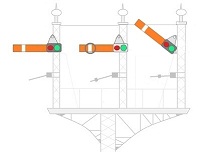
And the signals themselves (above) are worthy of description: until 1943, the junction was ‘protected’ from traffic coming up from Wimborne by a classic ‘two-arm’ signal array. The installation of a major system of sidings off a main running line (with the aforementioned facing point complication), meant that some method was needed to tell a driver that he could pass the junction signal (and junction itself), but only to proceed to the berthing loop and not fully into the next section (Woolslope Crossing / Ashley Heath / Ringwood). This was achieved by means of the three-arm, upper quadrant display shown here, with the centre arm known as a ‘calling-on’ signal: if the arm is raised (i.e., the signal is ‘off’), the driver interprets this as permission to pass this signal and onto the siding, but to be aware that he is then responsible for obeying hand-signals, watching for conflicting traffic etc., rather than the classic ‘next section is clear’ interpretation.
Also, both ‘outer’ arms are now at the same level; indicating that both the ‘old road’ line and the ‘Salisbury’ line are of equal priority. This was recognising fact, in that the Salisbury line was, despite being single track, a very busy route and could no longer be regarded as a ‘branch’.
Looking at the photographs of the ‘3-arm’ signal array (as portrayed above) it is tempting to suggest that when the war-time signal engineers changed the gantry they used a ‘cunning plan’!
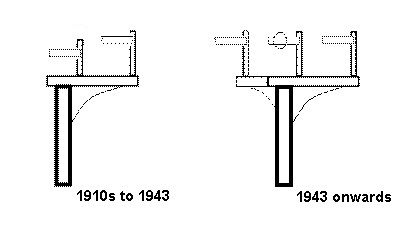
Remembering that (a) there were severe restrictions on materials availability and (b) they would need to avoid performing major alterations in the middle of other work going on, I suggest that they simply ‘bolted on’ (probably welded) an extension platform to the left of the existing level, with associated buttress, then the “new” Salisbury signal could be brought into use alongside the old one: that signal ‘covered’ until the calling-on arm could be fitted to a lengthened signal post, then that brought into use. All without major removal/installation of the base & upright and no disturbance to the ‘Ringwood’ signal. It’s only a theory – but it does account for the slightly ‘lop-sided’ appearance of the array on photographs.
The diagrams below show the gantry signals with the three variations .. and the ‘pathways’ that a train / locomotive would be authorised to take.
KEY: Ver = towards Verwood (i.e., the ‘Salisbury’ line); Ring = towards Ashley Heath & Ringwood (also known as the ‘Brockenhurst’ line, or ‘Old Road’); Wim = towards Uddens Crossing & Wimborne; SB = Junction signal box, on the western end of the ‘up’ platform, adjacent to (and controlling) the Station Road crossing; SG = signal gantry protecting the junctions ahead (as described above); GF = ground frame used to control the berthing loop and re-entry onto the ‘up’ line [locked electrically from the main signal box].
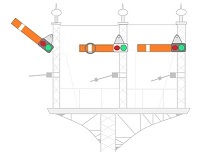
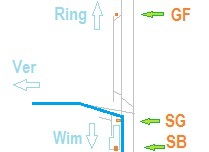
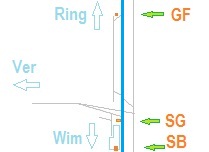

The middle arm on the gantry array is now ‘off’ for the fuel depot sidings indicating that the driver can proceed ‘with caution‘ onto the berthing loop off the main line.
I don’t, unfortunately, know the names of the men in the signalbox at this time, but in his book ‘West Moors for Ferndown‘, Deryck Wiseman mentions the names of “Mr Wilkins, Mr Waterman, Mr Ridout (probably Dick Ridout) …. ” in the 1930s, and it is reasonable to assume that at least one of these was ‘in post’ during the War. For those who manned the box, this phase of the war would prove challenging for all sorts of operational reasons: for example, given the obstructed view in the Ringwood direction (from both the pedestrian overbridge and station building), it would have been difficult to monitor the safety of trains waiting to leave the Salisbury line or what was happening beyond the junction where large tanker trains would have to slowly negotiate the new layout to access the Fuel Depot.
It should also be remembered that the signalman had to maintain safe contact with boxes on either side of him on the ‘old road’ (Ringwood & Uddens) and also up the Salisbury line. That means four sets of block/bell instruments: one each to communicate with the ‘up’ side and ‘down’ side boxes on the ‘main’ line & two more bits of kit for the Salisbury line: there were two distinct systems of working the tokens on this single line – one when Verwood was ‘in circuit’ and another when they were ‘switched out’ and West Moors worked with Fordingbridge.
Another complication for the signalman to cope with: when trains were coming down the Salisbury line, before they could be authorised to leave Verwood, the West Moors signalman had to effectively issue a ‘proceed with caution’ bell code to Verwood if the West Moors up-side goods siding was being shunted; the driver would have to acknowledge this explicitly before Verwood would release the train to travel south. Trains from Verwood could be cleared to enter the section, but with the proviso that they had to be prepared to stop at the West Moors ‘Home’ signal, which itself was on a sharp curve, if the goods siding was still ‘active’ onto the running line. To aid drivers of trains, a ‘repeater’ signal (yet another one) was placed about a quarter-of-a-mile BEFORE the Home signal to warn of the state of the latter signal.
And, although the single line might be regarded as a branch, in reality, even in peace-time, it was anything but: in war, traffic was heavy. This traffic had to be ‘fed onto’ the Old Road, and worked with dual-line running procedures – Woolsbridge Crossing (also known as Ashley Heath) and/or Ringwood in the east and Uddens Crossing and/or Wimborne in the west. Large formations of the fuel trains (I’ve seen reports of 50 wagons), must have straddled the crossovers and Station Road crossing at times, with heavy road traffic to be allowed for as well.
The theoretical maximum distance that signals could physically be worked by cable from a box was around 1500 yards (about 1.4 km, or around 8/10 of a mile); at least two of West Moors ‘Distant’ signals were beyond this length – the Newman’s Lane Distant (co-located with the Newman’s Lane crossing ‘home’) for example was listed as 1618 yards away (not far short of a mile), with the signal wires having to turn a particularly sharp curve. With the poor standard of maintenance during wartime, the added friction would have given the signalman a hard ‘pull’. However, as trains would have to be slowing-down anyway on approach to the sharp (and blind) curve on approach to West Moors, it would seem sensible to regard this particular signal as ‘fixed’ (i.e., remaining in the same position at ‘caution’), even though it is not listed so in the various signalling diagrams. In this way train crews would be prepared to come to a halt before the junction, even if in the event they were allowed to proceed without coming to a stand.
The signalmen at this small rural station had a heavy responsibility for safety, particularly when you consider what was being moved about the area under the control of the box. No record of any incidents have come down to us so we must assume that they performed their duties to the highest standards. As much as any fighting sailor, soldier or airman, they too did their bit.
… OPERATION OVERLORD – BRINGING FREEDOM BACK TO EUROPE:
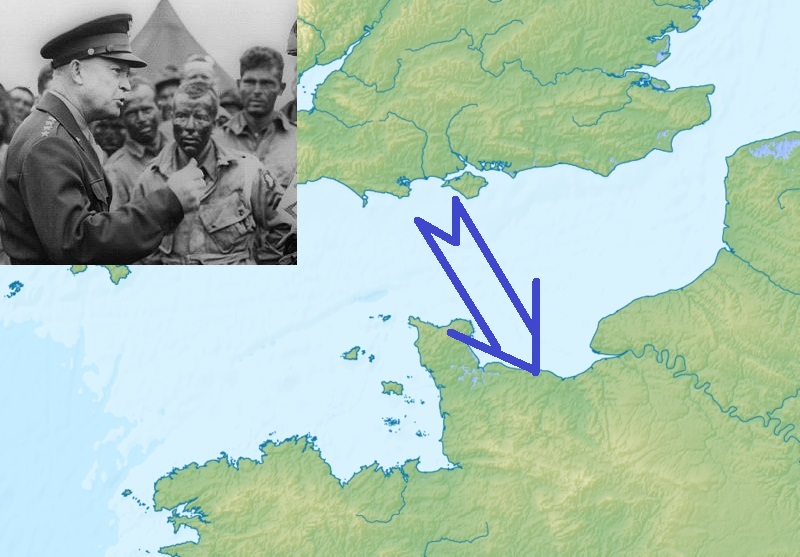
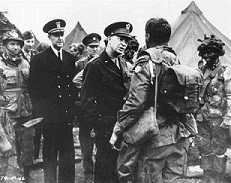
D-Day would have come as a great (though welcome) surprise, though villagers who had experience of military matters (and there were a large number of retired army officers living here), would have guessed that ‘something was up’! In the months prior to June 6th, 1944, large convoys of road tankers trailed to and from the Depot – supplying forces with fuel, lubricants etc., and all these had to pass through the village or north towards Three Legged Cross. No-one could be unaware of this traffic or what it all meant. Here, the Supreme Allied Commander, Dwight Eisenhower, is meeting troops only a few days prior to 6th June, 1944.
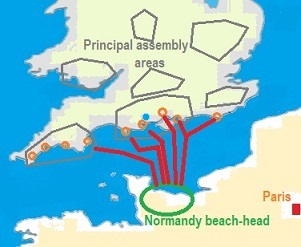
This diagram (below) shows the main ‘assembly’ areas for allied forces prior to D-Day and the cross-Channel routes taken by the invading forces. In addition, airborne forces took off from airfields well inland. All these units needed fuel, and the West Moors depot [ indicated by the blue dot on the map ] was one important part in this operation – failure of its supply would have been a severe handicap to the success of Operation Overlord; West Moors would have been the primary supply point for most units in the western-half of the main embarkation area shown on the map.
As Allied forces fought their way across northern France, the Low Countries and into Germany during the latter half of 1944 and the first half of 1945, activity in and around the depot slowed – fuel could be supplied to new port facilities on the European mainland, both by ship and via pipelines laid on the sea-bed between the Isle of Wight and the north Frence coast (PLUTO).
Victory in Europe, though delayed over the winter of 1944/45, was always assured. It came, formally, on the 8th May of 1945 and on this V.E. (Victory in Europe) Day, the whole village celebrated with a street party. The peace, after so much activity, must have been very welcome.
But in the Far East, where British forces were still heavily engaged against the Japanese in Borneo & Burma, it would be another three months before conflict ended in the Pacific theatre (and with it the Second World War) with the Japanese government surrendering on August 15th, following the dropping of the two nuclear bombs several days earlier.
… WE WILL REMEMBER THEM:
But of course, as always in war, some would never return home. From the village war memorial, which until the 1970s was at the end of Pinehurst Road, 20 local people, including two women, are listed amongst those who would not see the settled peace. One of the women was Molly Hare who was the daughter of John Hare, who ran one of the large poultry farms along Pinehurst Road; she was 27 years old and is listed as having the rank of Leading Aircraftwoman (LACW).
Lt. (RN) Maurice F. Wykeham-Martin [b.1913], was an officer aboard HMS Salmon, a submarine on patrol in the North Sea; after successfully executing operations against German naval shipping in the North Sea, the vessel was lost with all hands on 9th July 1940; it is presumed that she hit a mine. But tragedy was to strike the same family again (then living in Highfield Road) three years later …
Maurice’s younger brother, S/L Dennis Fiennes Wykeham-Martin, DFC, Royal Air Force Volunteer Reserve [b.1914] also did not return to West Moors. On 14 May 1943 at 0026 hrs, S/L Wykeham-Martin took off from Aldergrove (Northern Ireland). One minute later his Liberator III FK234/W crashed. Four members of the crew were killed outright, but the captain (S/L Wykeham-Martin) and Sgt. J. M. Little, his co-pilot were recovered at the crash scene, but both died later from serious head injuries. Dennis Wykeham-Martin had been commissioned into the RAFVR in January 1939 and in July 1940, he was flying with 53 Squadron (based at Detling, near Maidstone, Kent) which operated Bristol Blenheims in the support bombing & reconnaissance role. Later, he moved to St. Eval in Cornwall and undertook long-range reconnaissance, anti-submarine & meteorological sorties in the SW Approaches & the Bay of Biscay, before finding himself in Northern Ireland on similar duties, equipped with the Liberator – here, he lost his life.
And an old West Moors name is remembered on the Memorial of the fallen: Arthur William Woolford, born in 1916 who was the eldest son (and second child) born to William Woolford and Gladys Vine – the Vines of course also part of our story – and they suffered a loss in the Great War (see previous section). Arthur served with the 2nd Battalion, Coldstream Guards and was killed-in-action in February 1944 in southern Italy as the allies fought their way north.
… PEACE – WITH AUSTERITY:
As already noted, by the end of 1944, the fuel depot had seen its activity sharply decline (and with it the road and railway traffic it generated) and by 1946, the U.S. Army handed the depot back to the War Department. It was used to house German POWs in temporary huts.
At the end of the war, the nation was elated – but exhausted. For nearly six years, all the resources of this small country had been devoted to one end: victory. Major infrastructure projects that had no part in that aim were abandoned in September 1939 and routine maintenance was sacrificed to operational expediency. This policy affected all, but none more so than the railways. Put simply, by 1945, they were worn out!
There was to follow a period when, for railway management, time stood still. The Labour party had won a large majority in the House of Commons in 1945 – transport nationalisation was part of their plan – and it would happen in time; meanwhile, the railway companies (as commercial organisations) had to come back to life after the war and try and manage the present and plan for the future – though the REC was still in nominal existence to aid the management of this precious resource.
Running a weakened, impoverished railway in the years just after the War was a thankless task …. but that tale belongs elsewhere …..